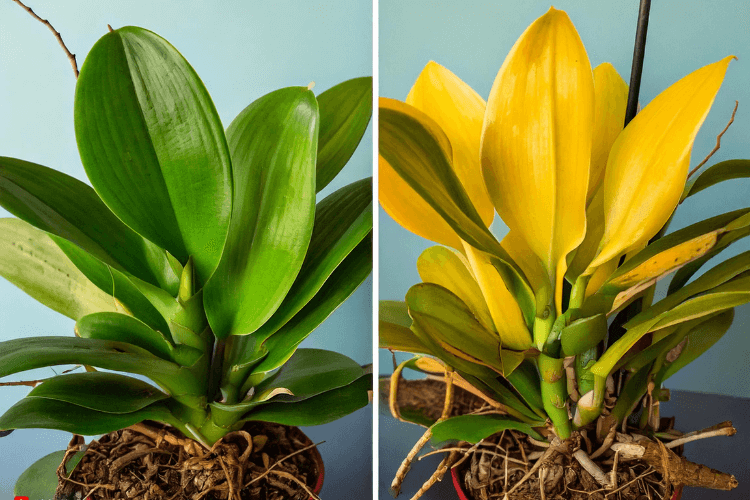
If you’re an orchid enthusiast, you’ve probably experienced the unsettling moment when you notice orchid leaves turning yellow. It’s a common problem for orchid owners, but it doesn’t always mean that your plant is beyond saving. Instead, it’s a signal from your orchid that something is wrong, and you need to take action. Understanding the reasons behind yellowing orchid leaves and how to remedy them is crucial for maintaining a healthy and thriving orchid collection.
In this guide, you’ll discover why your orchid leaves are turning yellow, the possible causes behind this issue, and effective solutions you can apply. By the end of this article, you’ll be equipped with the knowledge to restore your orchid’s health and ensure it thrives.
Table of Contents
Understanding Orchid Leaves Turning Yellow: Common Causes

Before diving into solutions, let’s first explore the potential causes behind orchid leaves turning yellow. Orchids are delicate plants, and the health of their leaves can be affected by a number of factors, including environmental conditions, watering habits, and nutrient levels.
1. Overwatering and Underwatering: The Delicate Balance
One of the most common reasons behind yellow orchid leaves is improper watering. Orchids, like all plants, need the right balance of water. Too much or too little water can cause stress, leading to yellow orchid leaves.
- Overwatering is often the main culprit. If the roots are consistently waterlogged, they can rot, leading to yellowing leaves. Orchid roots require air to thrive, and excess moisture can block the oxygen they need.
- Underwatering can also cause the leaves to turn yellow. When orchids don’t get enough water, the plant starts to conserve moisture by shutting down non-essential functions, resulting in yellowing leaves.
Solution:
- Check your watering schedule: Orchids typically need water once a week, but this can vary based on the type of orchid and the climate you live in.
- Proper drainage is essential: Ensure your orchid pot has sufficient drainage holes, and use a well-draining medium like bark or sphagnum moss.
- Water when the top inch of soil feels dry: Stick your finger into the soil to test moisture levels.
2. Light Conditions: Is Your Orchid Getting Enough Light?
Orchids need plenty of light, but they do not thrive in direct sunlight, which can burn their delicate leaves. Insufficient light can also cause orchid leaves turning yellow.
- Too little light causes the plant to struggle, as it isn’t able to produce enough energy through photosynthesis.
- Too much direct sunlight can scorch the leaves, causing them to turn yellow and eventually dry out.
Solution:
- Move your orchid to a spot with indirect sunlight: Place your orchid in a room where it gets bright, but indirect light, such as near a window with sheer curtains.
- Rotate your orchid: Ensure that all parts of the plant receive light by rotating it every few weeks.
3. Nutrient Deficiency: Is Your Orchid Getting Enough Food?
Just like any plant, orchids need proper nutrition to remain healthy. A lack of nutrients, especially nitrogen and iron, can result in yellowing orchid leaves. Nutrient deficiencies prevent the orchid from carrying out essential functions, including leaf production.
- Nitrogen is vital for healthy leaf growth. Without it, your orchid may develop yellow orchid leaves.
- Iron is another key nutrient for orchids, and a deficiency can lead to yellowing and weak growth.
Solution:
- Fertilize regularly: Use a balanced orchid fertilizer, such as a 30-10-10 formula, once a month.
- Check the pH of your soil: Orchids prefer slightly acidic soil, so check the pH and adjust if necessary.
- Repot your orchid if the soil has become depleted of nutrients or is compacted. Fresh potting mix can help restore the plant’s nutrient intake.
4. Pest Infestations: Are You Dealing with Unseen Visitors?
Pests, such as mealybugs, aphids, and spider mites, can also cause orchid leaves turning yellow. These pests suck the sap from your orchid, depriving it of essential nutrients and damaging the leaves.
- Mealybugs leave a white, cotton-like residue and can cause yellowing leaves.
- Aphids leave sticky residue on the leaves and are often seen in clusters.
Solution:
- Inspect your plant regularly for pests. Look for any signs of bugs, webbing, or sticky residue on the leaves.
- Treat your orchid with insecticidal soap or neem oil, which are both effective and safe for orchids.
- Wipe the leaves with a damp cloth to remove pests and prevent reinfestation.
5. Aging Leaves: Is Your Orchid Just Shedding Old Leaves?
Sometimes, yellow orchid leaves are a natural part of your orchid’s life cycle. As orchids grow, older leaves naturally die off. If your orchid is shedding older leaves, it may simply be going through a normal aging process.
Solution:
- Don’t panic if you see a few old leaves turning yellow. As long as new leaves are emerging, this is likely a sign that your orchid is growing.
- Trim yellowing leaves carefully to keep the plant looking neat and healthy. Use sterile scissors to avoid introducing any pathogens.
How to Fix Orchid Leaves Turning Yellow: Step-by-Step Guide
Now that we know the main causes, let’s go over practical steps you can take to fix orchid leaves turning yellow.

Step 1: Assess Your Watering Habits
- Adjust your watering schedule: If you’re overwatering, cut back and let the soil dry out between waterings. If you’re underwatering, increase the frequency slightly, ensuring the soil stays moist but not soggy.
- Check for proper drainage: Make sure the pot allows water to escape easily. Standing water can lead to root rot.
Step 2: Evaluate the Light Conditions
- Find the right light: Place your orchid in a location with bright, indirect sunlight. If direct sunlight is an issue, use sheer curtains or relocate your orchid to a more suitable area.
- Consider a grow light: If you don’t have access to natural light, consider using a grow light to provide the right light conditions for your orchid.
Step 3: Fertilize Your Orchid
- Use a balanced fertilizer: Fertilize your orchid once a month with a balanced orchid fertilizer to address any nutrient deficiencies. Avoid over-fertilizing, as it can lead to root damage.
- Repot if necessary: If your orchid hasn’t been repotted in a while, consider doing so to refresh the soil and improve nutrient availability.
Step 4: Treat for Pests
- Inspect for pests: Regularly check your orchid for any signs of pests or diseases.
- Apply neem oil or insecticidal soap: These natural remedies are effective in treating most common orchid pests. Always follow the instructions on the label.
Step 5: Prune Yellowing Leaves
- Trim yellow leaves: Using sterile scissors, remove any yellow or dead leaves to encourage new growth. This will also help prevent any potential diseases from spreading.
Preventing Orchid Health Issues: Orchid Care Tips for Healthy Plants
Now that you’ve fixed the issue, here are some orchid care tips to prevent future orchid leaves turning yellow:
- Regularly inspect your plant for pests: Early detection can save your orchid from serious damage.
- Ensure proper humidity: Orchids thrive in a humid environment. Keep the humidity levels around 50-70%.
- Repot when necessary: Orchids generally need repotting every 1-2 years, depending on the type. Use fresh, well-draining potting mix each time.
- Water properly: Follow a consistent watering schedule and ensure good drainage.
Conclusion: Get Your Orchid Back to Health
If you’re wondering why your orchid leaves are turning yellow, remember that it’s often a sign that something isn’t quite right. Whether it’s due to watering issues, lighting, pests, or nutrient deficiencies, the key is to identify the cause and take action quickly.
By following the orchid care tips outlined in this guide, you can restore your orchid’s health and prevent future issues. Don’t be discouraged by a few yellow leaves—orchids are resilient, and with the right care, they’ll bounce back beautifully.
Take action today: inspect your orchid, adjust its care routine, and get it back to thriving. Your orchid will thank you with vibrant, green leaves and beautiful blooms.
FAQs About Orchid Yellow Leaves
- Why are my orchid leaves turning yellow?
- Orchid leaves turning yellow could be due to overwatering, underwatering, insufficient light, nutrient deficiencies, or pest infestations.
- How do I fix yellow orchid leaves?
- Identify the cause and adjust watering, lighting, or feeding practices. Treat for pests and prune yellow leaves to encourage new growth.
- Can orchid leaves turn yellow due to overwatering?
- Yes, orchid leaves turning yellow can be a sign of overwatering, which leads to root rot. Ensure proper drainage and water less frequently.
- What should I do if my orchid leaves are drooping and yellow?
- Drooping orchid leaves and yellow orchid leaves might indicate underwatering or nutrient deficiency. Check your watering schedule and consider fertilizing.
- How to prevent orchid yellowing leaves?
- Regularly inspect your orchid, provide proper light and humidity, and avoid overwatering to keep orchid leaves turning yellow at bay.
By following these tips and staying consistent with your care routine, you’ll be able to keep your orchids healthy and vibrant for years to come.

